ACTIVITY
Wallet Report User Report System Logs System Orders
AFFILIATE
How to Enter Payment Details for Affiliates
DASHBOARD
Dashboard Overview Reset Admin Password
GENERAL
A Step-by-Step Guide to Leaving a Review on Codecanyon How to find my Purchase Code and my buyer name? Google Re-Captcha Integration Guide Create Backup & Restore Licenses Move your site to a new domain or a new hosting: A Quick Guide Customizing Mail Templates: Logo & Footer Which plugin to use for implement script in WordPress page/post? Configuring Important Hosting Settings Recommend Hosting How To Set SMTP? How to reset my license key?
HOSTING
Configuring Important Hosting Settings Recommend Hosting
INSTALLATION
How to upgrade from a regular license to an extended license How to find your purchase code? Move your site to a new domain or a new hosting: A Quick Guide How to reset my license key? Installation Nginx Hosting
INTEGRATIONS
How To Add Shopify Campaign? Actions Integration Example PostBack Integration Order Commission Example How To Integrate General Click Tracking How To Create WooCommerce Integration? How to add recurring integration? How to create sale integration? Which Integrations are supported? How To Create Action Integration? How Order/Service Integration Works?
LOCAL STORE
Adding Bulk Products to Your Store Using XML or Excel Fast start – Store module Store categories Cart mode – Add product How to share local store affiliate links? Sales mode – Add product Local Store Commission Display products on the new products section How to upload multiple images for a product? General Information – Store Set google analytics, google map, google recaptcha and contact us address Forms Edit About Us / Contact Us / Policy Pages Set Theme Pages And Menu Set Theme Sections Add order comments option to checkout Set shipping method Local store setting
MARKETING
General Information – Marketing Add New Program Add New Click Campaign Add New Action Campaign Add New Sale Campaign Ratio feature
MEMBERSHIP
How Membership module is working? How to approve/update an order status? Set Payment Methods How to create a plan How to create a trail package? How to set a group to the membership module? disable/enable membership module
MLM
Configuring MLM Commissions for External Stores MLM Commissions in Store Module Membership Commission Setup in MLM Setting Up Registration Commissions in MLM How to Configure MLM Levels and Values MLM Commission Logic: Example and Explanation with Additional Features Finding and Using Your Affiliate Invitation Link Configuring MLM Sponsor Display Enabling and Disabling MLM
Multiple Pages Theme
How to edit terms page? Edit Instructions for the setting page? How to add/edit pages to the theme? How to edit faq page? How to edit home recommendation content? How to edit home page video section? How to edit home section content? How to edit home page content? How to edit home page top slider?
PAYMENTS
Payments API System Payments transactions Payment Gateways
SAAS
How to reverse your user deposit amount back? How to set a minimum deposit to a vendor? Vendor order integration flow example Which Options Are Available In The SaaS Module? HOW VENDOR PROCESS IS WORKING ON THE SYSTEM? How to start with my vendor account? How SaaS module is working? Setting a Commission as a Vendor to Affiliates Setting a Commission to Admin on Vendor Product/Banner Set Affiliate Account as a Vendor Account Enable and Set SaaS for Tool Marketing Module
SUPPORT
How to get a support? What is script support terms include?
USEFUL LINKS
How to Add Google Ads to the User Panel Theme Design User Dashboard Cron Job Google Re-Captcha Integration Guide Tracking Cookies Terms and Condition Setting Overview Email Setting Site Setting Themes Award Level Module: A Comprehensive Guide Add Ons How to Integrate the Registration Process with Your Site Currency Language
USERS
How to Add a Sub-Admin in the Admin Panel Replace Admin username Auto-Approve User Registration Newsletter Adding manual commission Admin Profile Change Admin Default Password Reset Admin Password
WALLET
How to Add a New Payment Method to the Payouts Module Auto-Withdrawal Process Manual Withdrawal Process
Back

How to create sale integration?

By admin

CPS – Cost Per Sale Integration:

  • Step 1 – create a program
  • Step 2 – Create a banner

Step 1 – Create program instructions

  • Run the script using HTTPS protocol, if not, then it can affect the tracking
  • Navigate to Marketing Tools>>Add Program
  • Add your new affiliate CPS[cost per sale] program


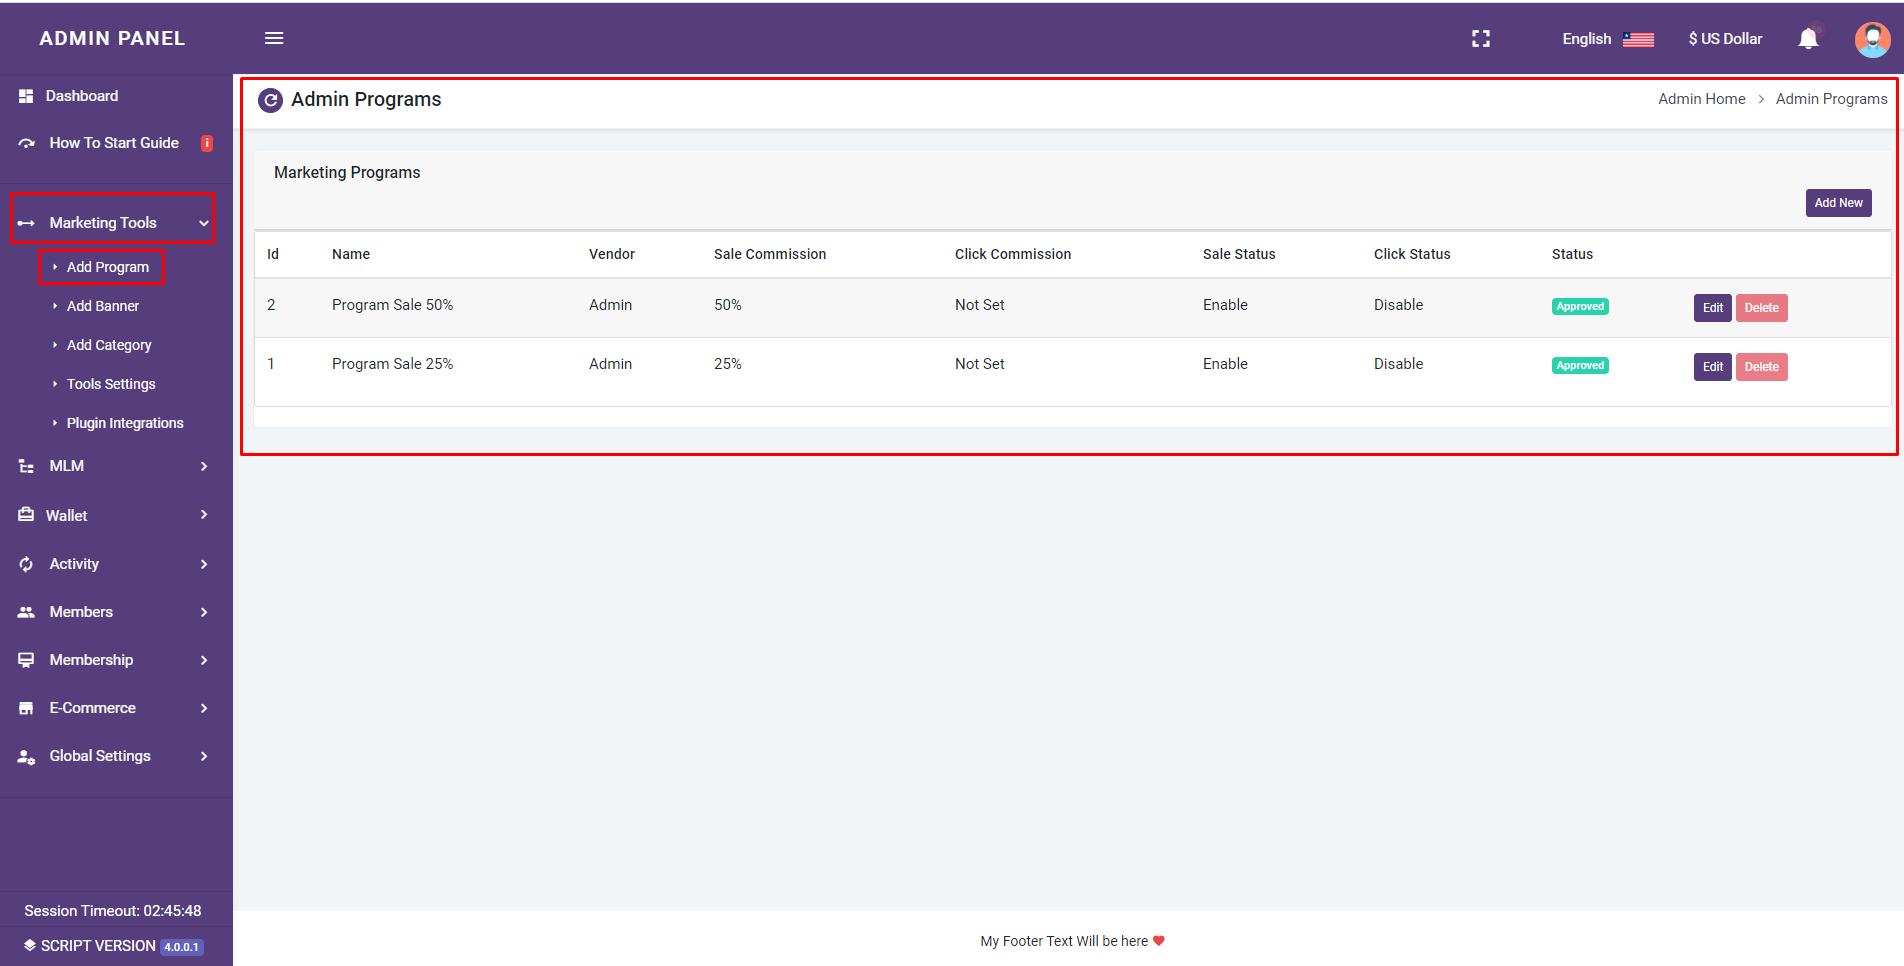
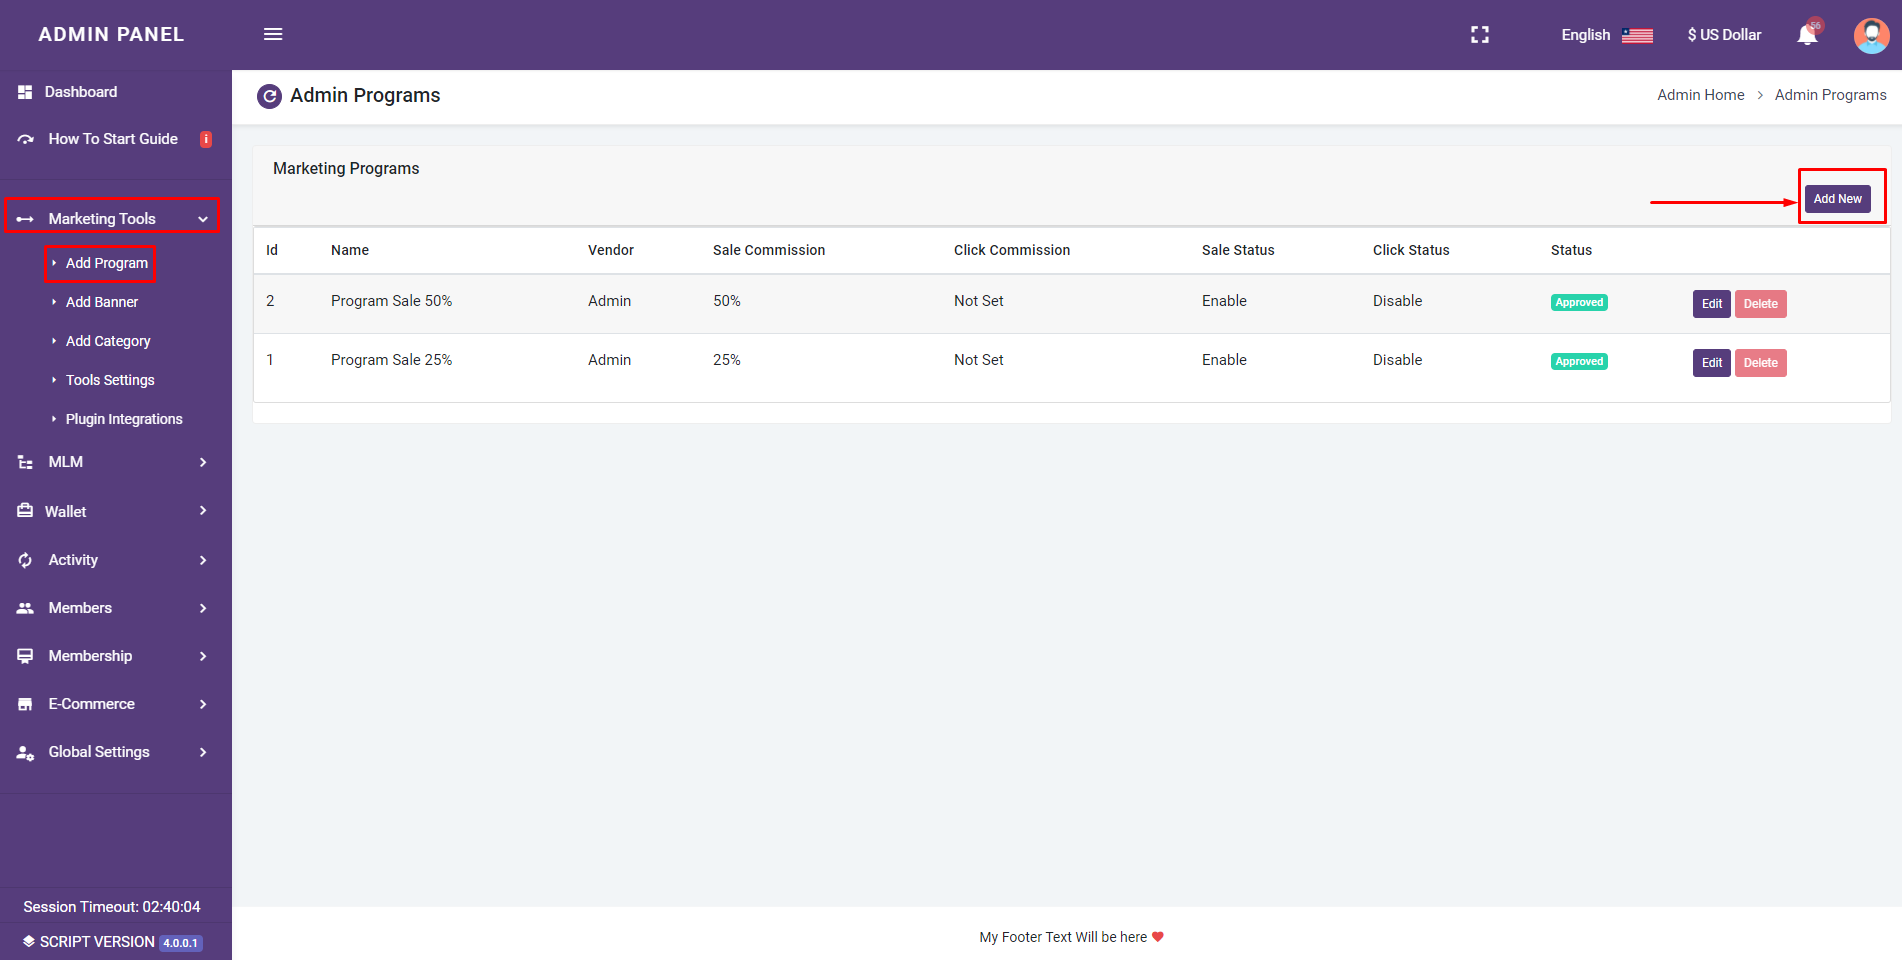
Press on the “add new” button


Set

Sale Commission Settings:

  • Set
  • Set
  • Set


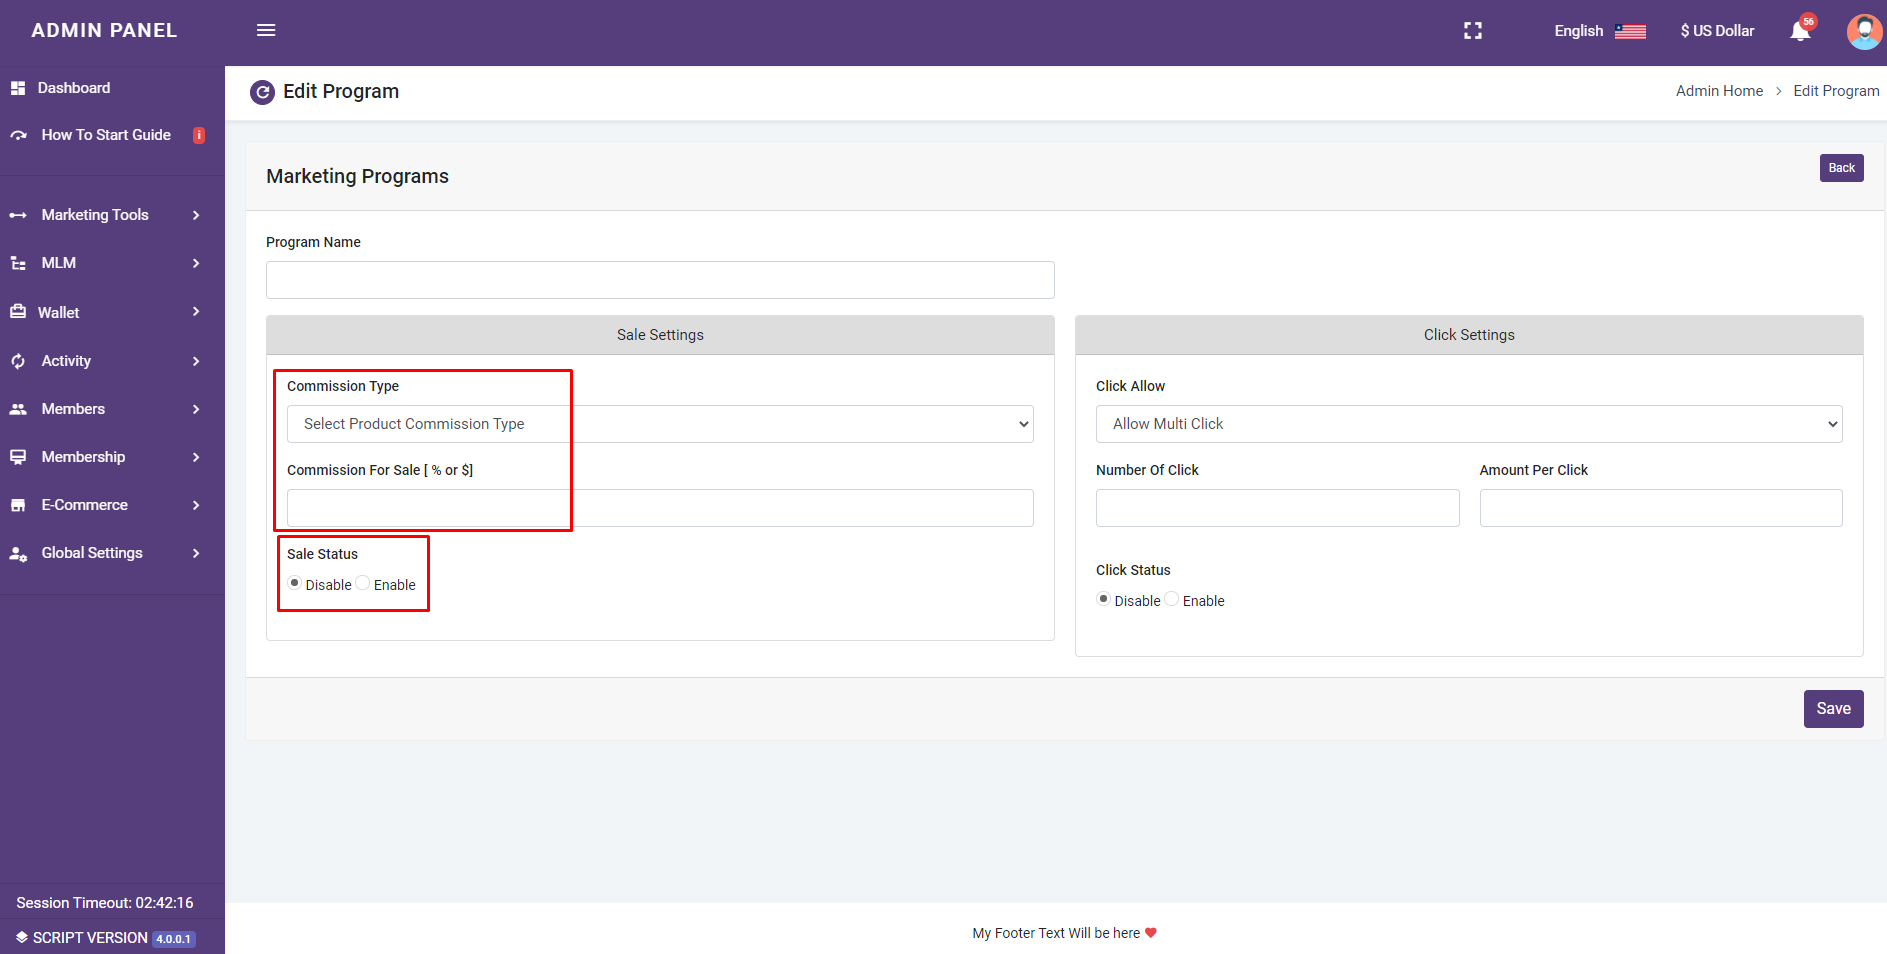
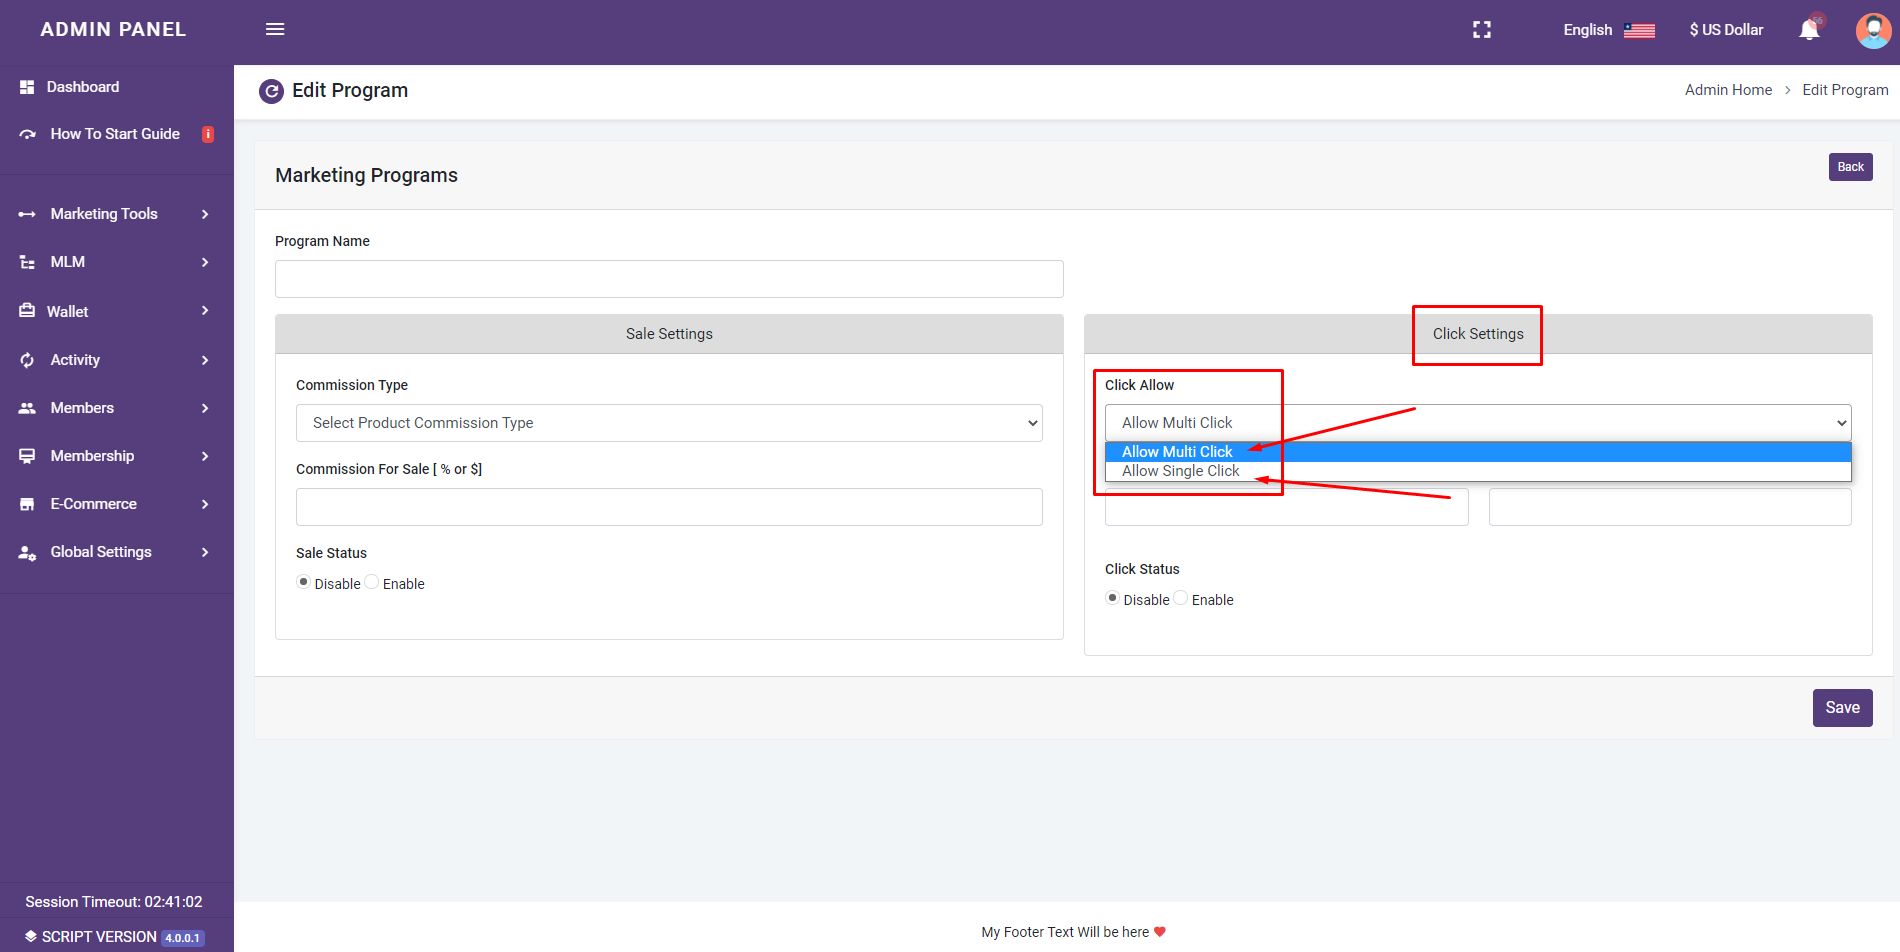
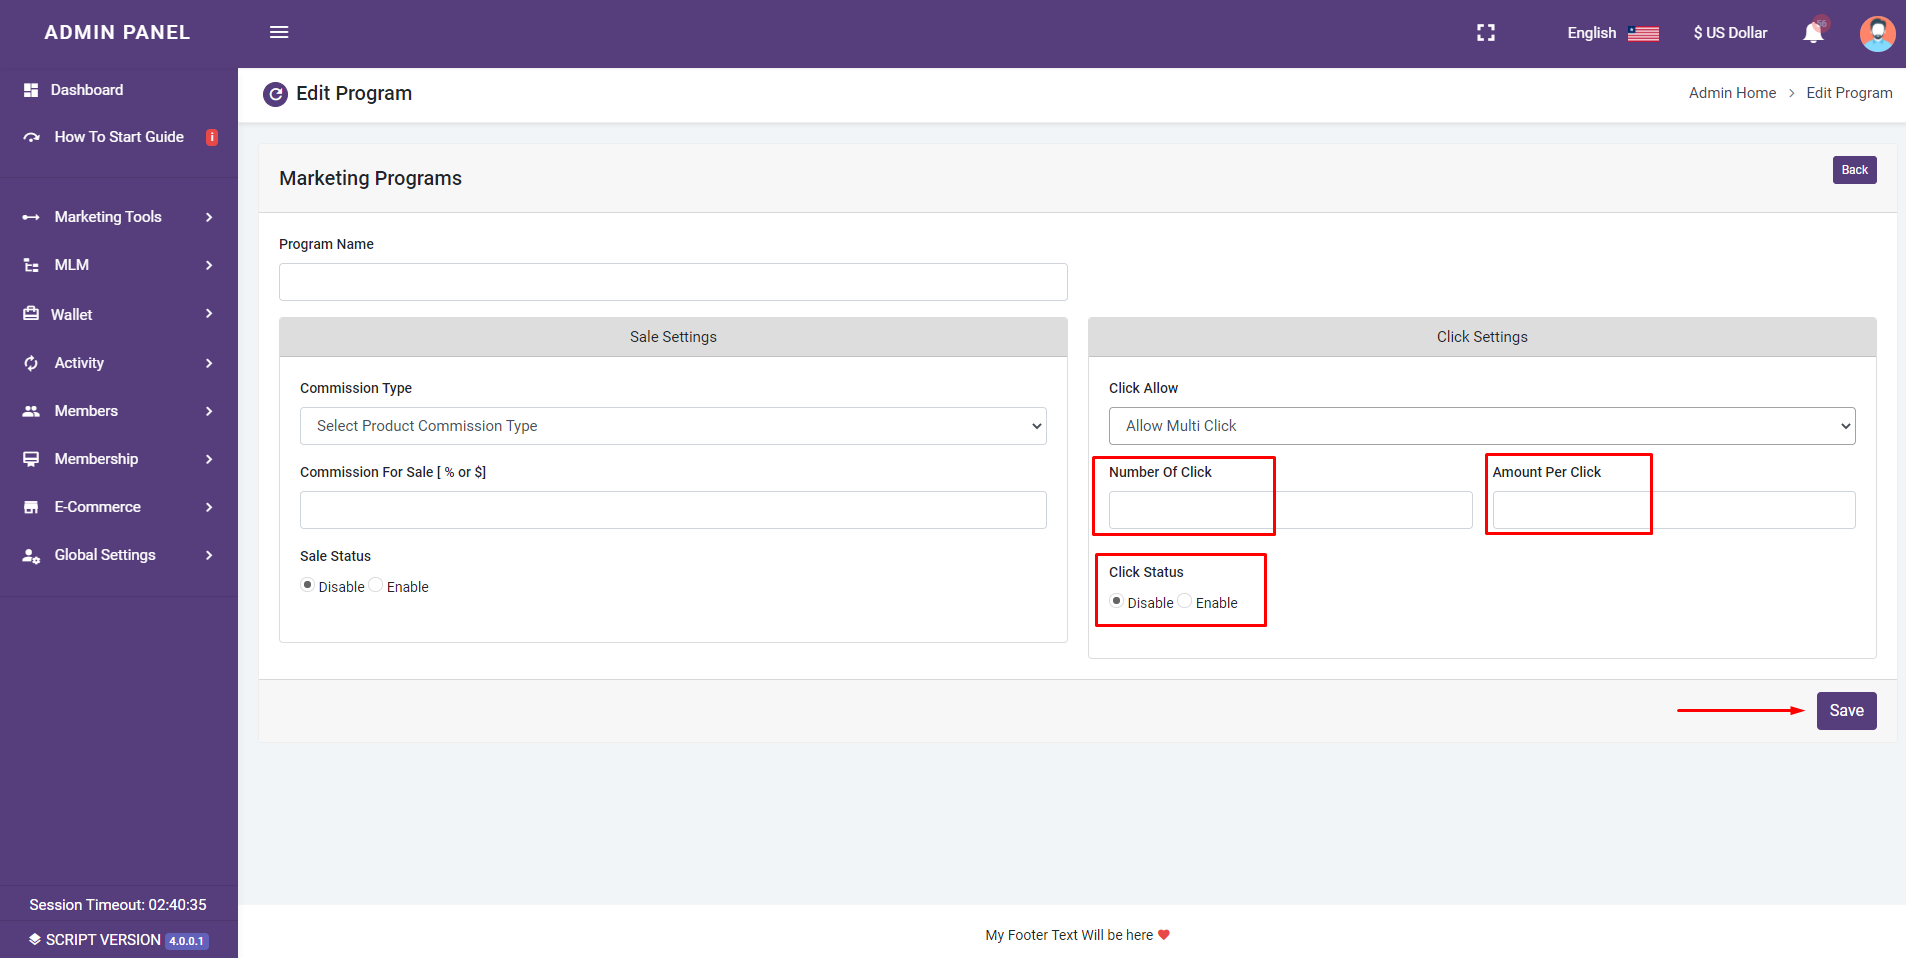
Click Commission Settings:

  • Set
  • Set
  • Set

Finally, save!


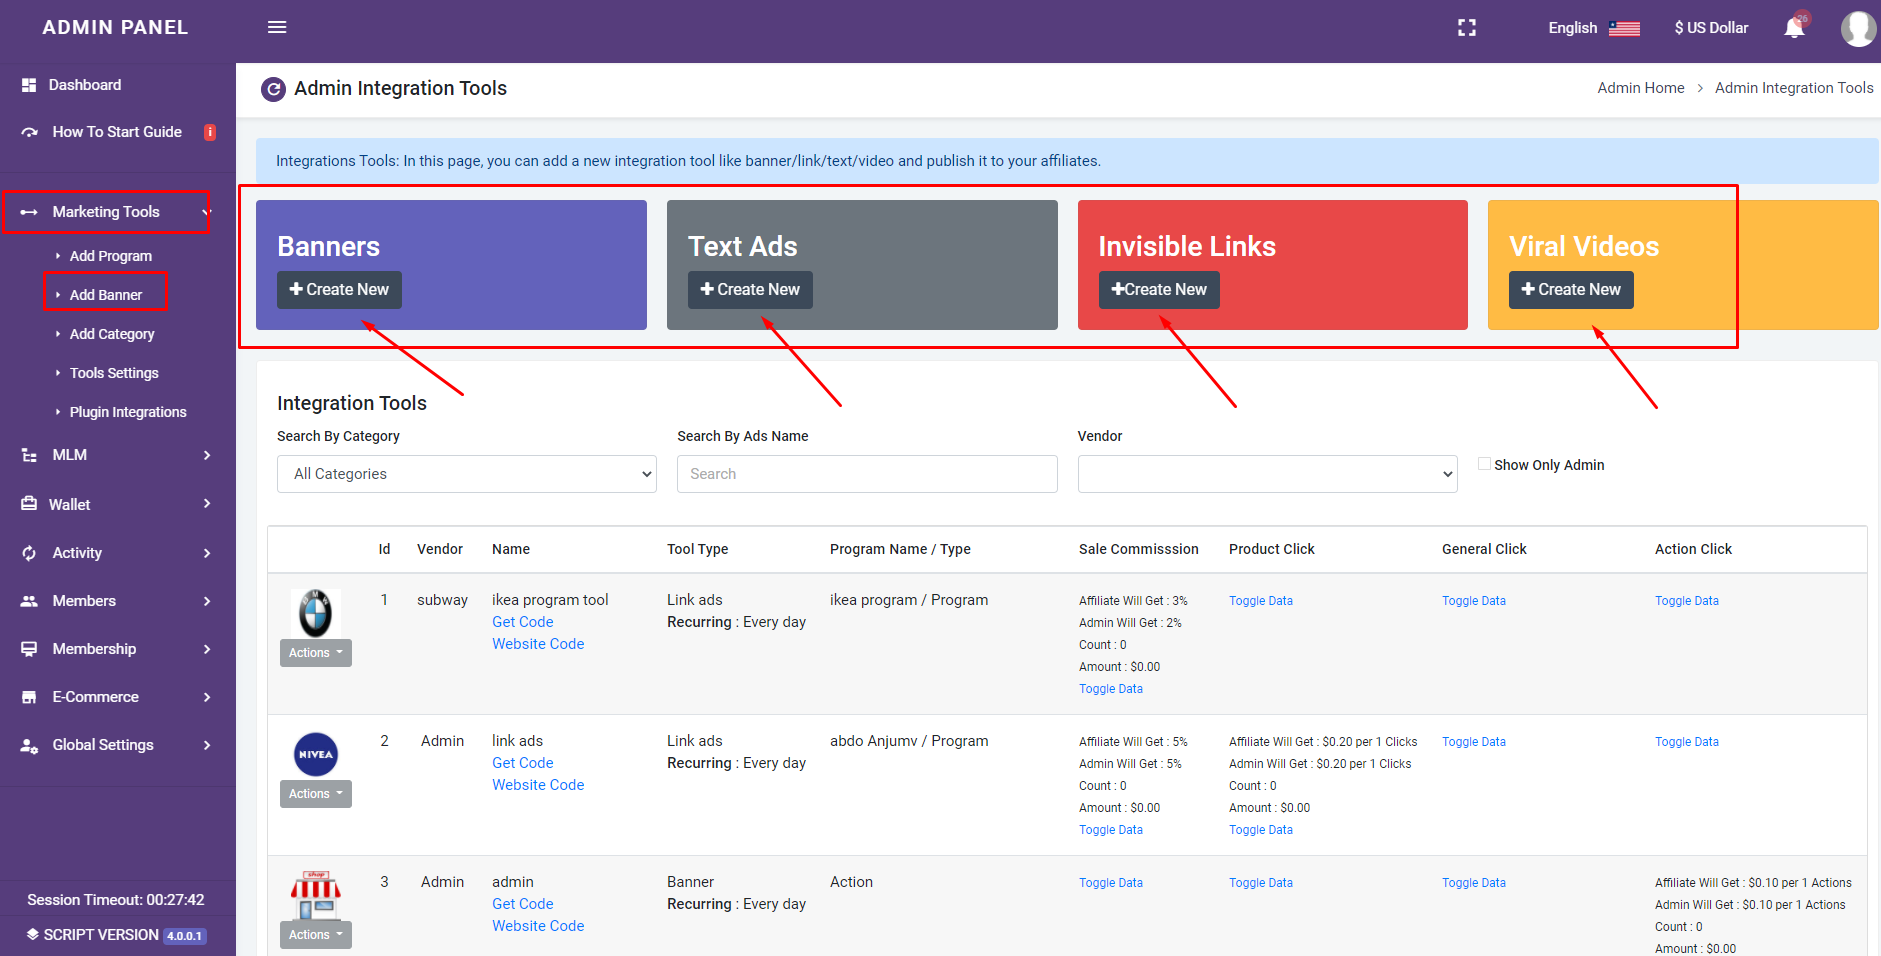
Step 2 – Navigate to Marketing Tools>>Add Banner

Create a new banner from the available options


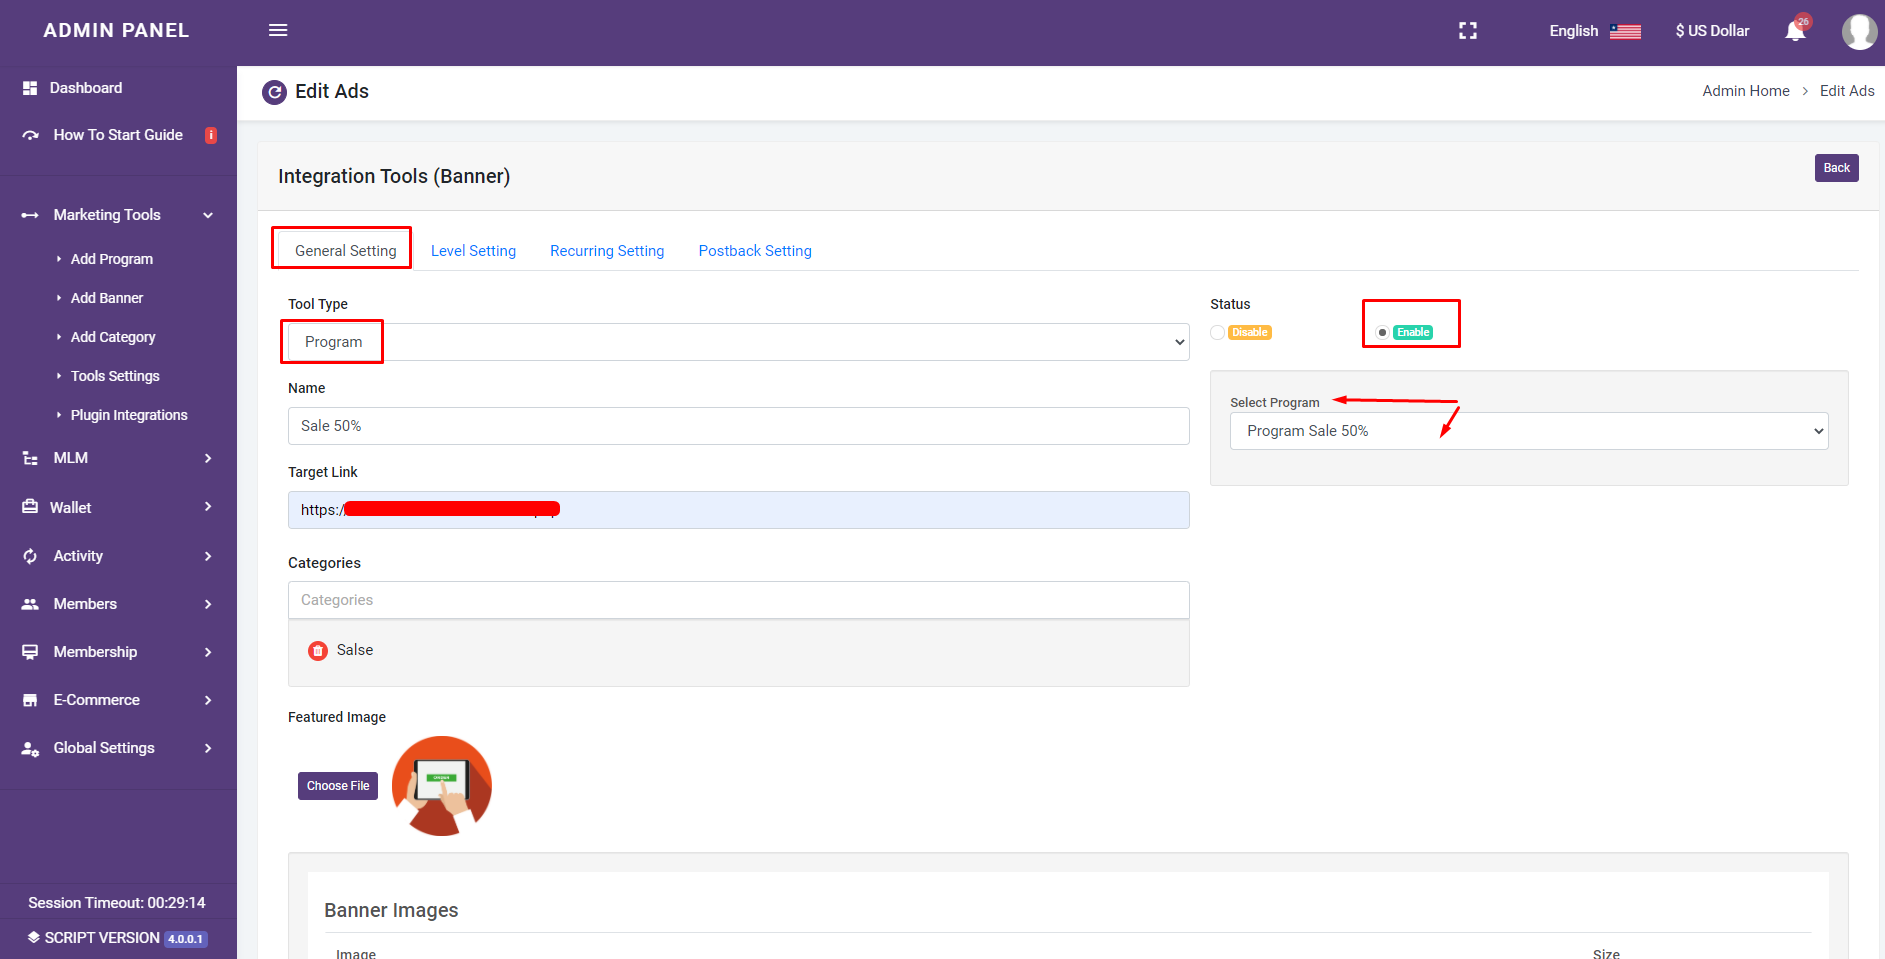
On the general setting tab set all the banner data

  1. Choose “Program” in the tool type dropdown.
  2. on the right side, set the banner as enable, in case you want to publish it.
  3. select your sale program from the list.
  4. Set your external site/store/page target link, that you want your end-clients will be landing after press the affiliate banner.
  5. Choose category[option]
  6. choose icon and image[must set]

finally, save.


Using CMS? This step is for you!

[ if you are using a custom store site or any other framework, just jump to the next step after].

If you are using cms like wordpress/Shopify/Magento…etc, please just install the plugin using the instructions in our plugins page under the left menu: Marketing tools>>Plugin instructions, find your plugin on that page and press on it, and you will find the installation instructions as well.


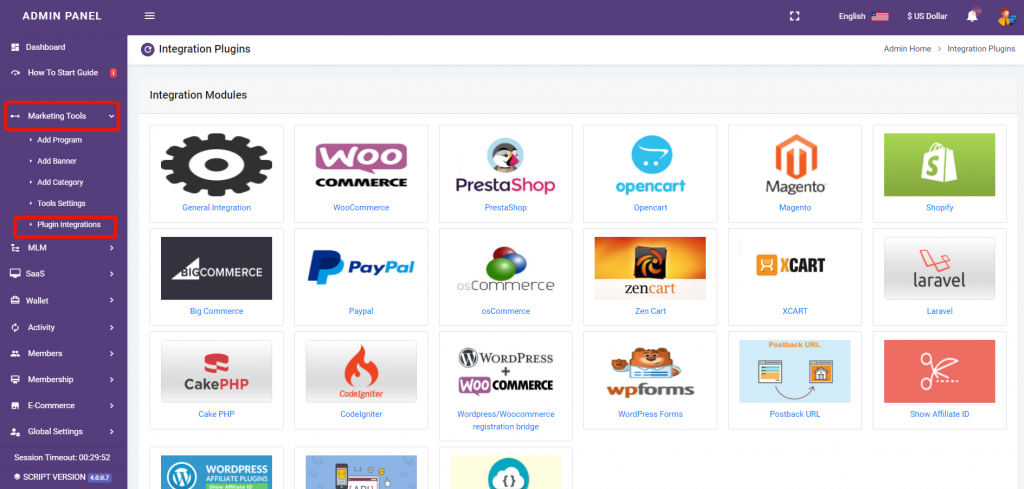
Are you using a custom store site or any other framework, This step is for you!

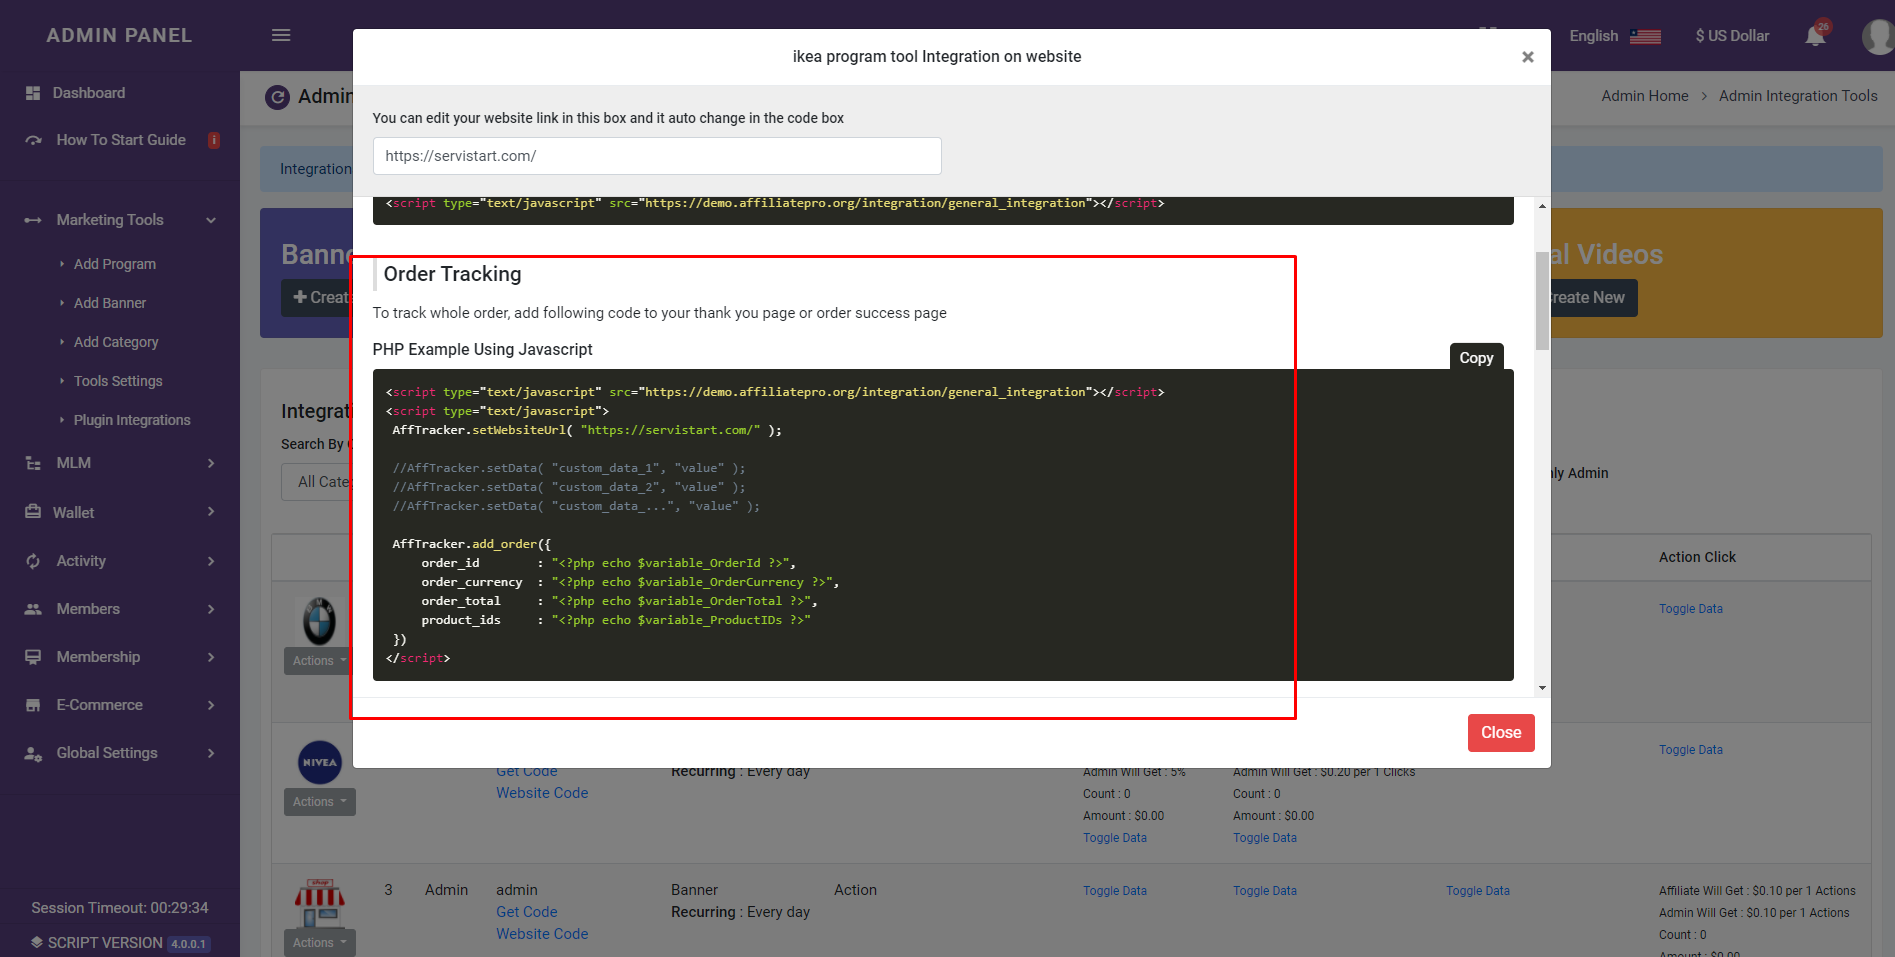
Press on website code to get the code to your order confirmation page

[This is the page that your clients will redirect after payment is complete successfully]


Set the common tracking code on your site header[the header must be common to all site pages]


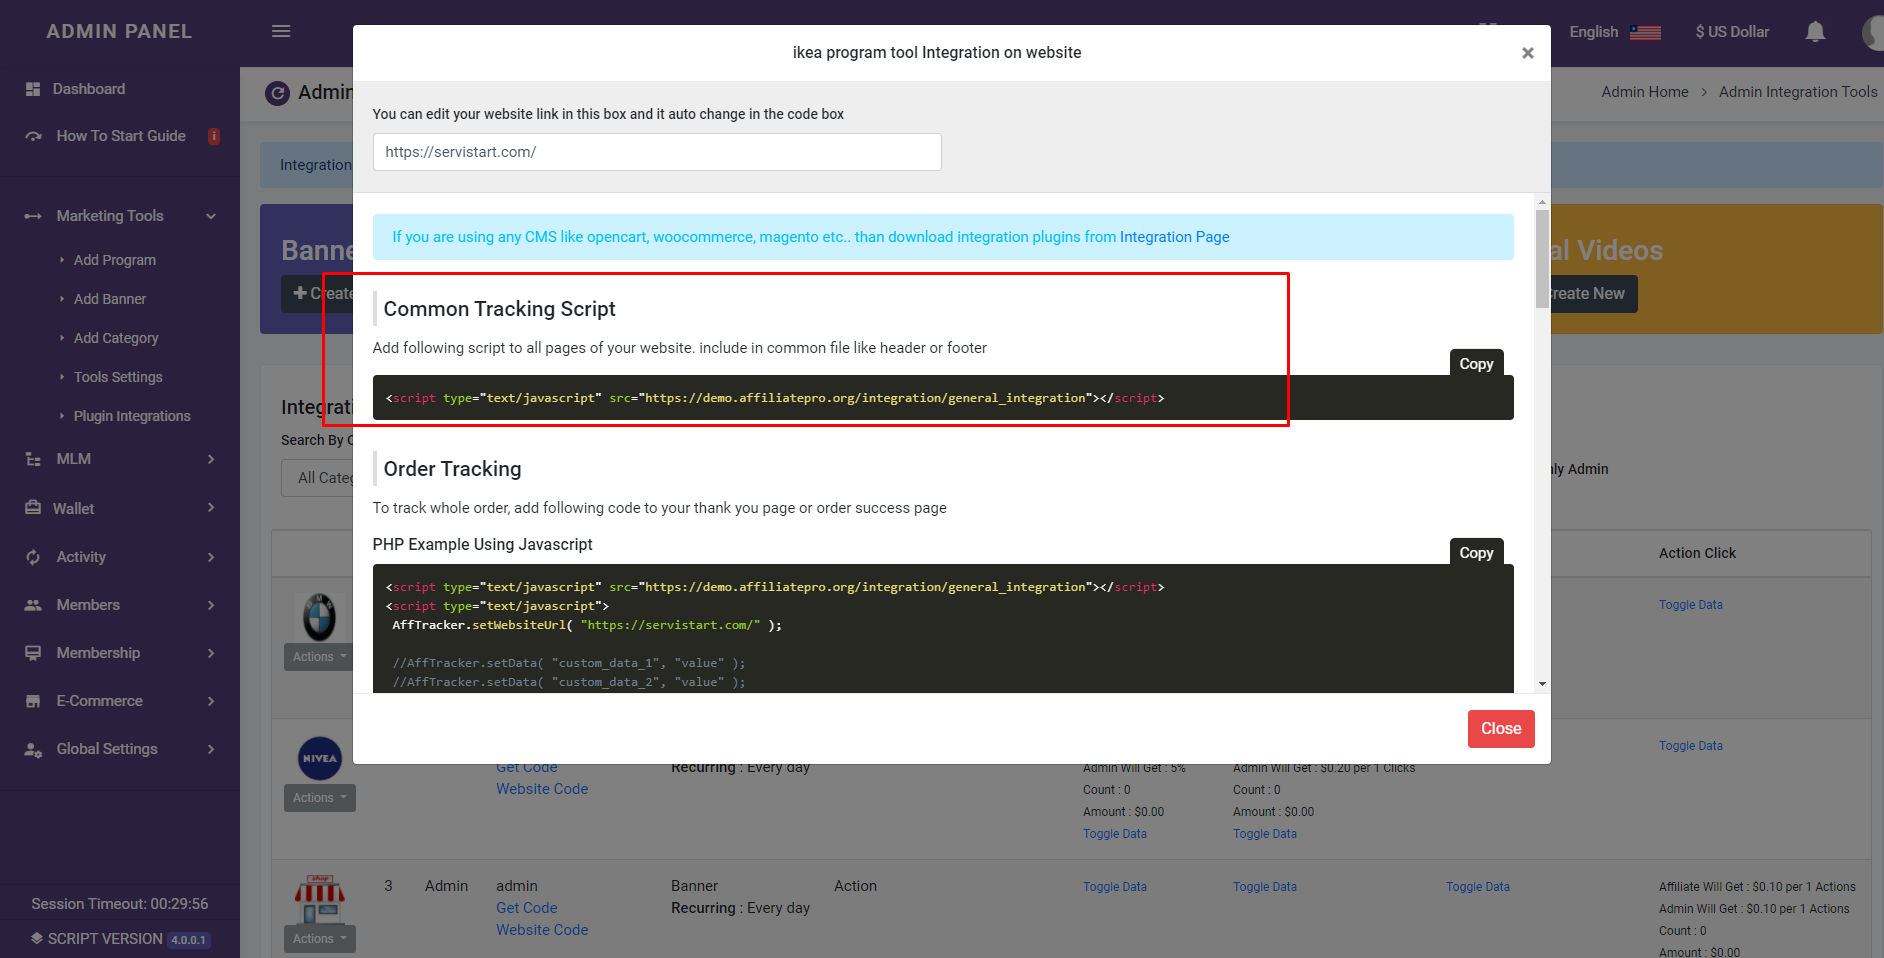
Instructions to the order tracking code integration:

This code needs to integrate into your order confirmation page with your site variables

OrderId – replace it with your dynamic variable.
OrderCurrency– replace it with your dynamic variable.
OrderTotal– replace it with your dynamic variable.
ProductIDs– replace it with your dynamic variable.
WebsiteUrl = it auto set in the banner, just insert your site page or the page you want your users will land on when they press on the banners


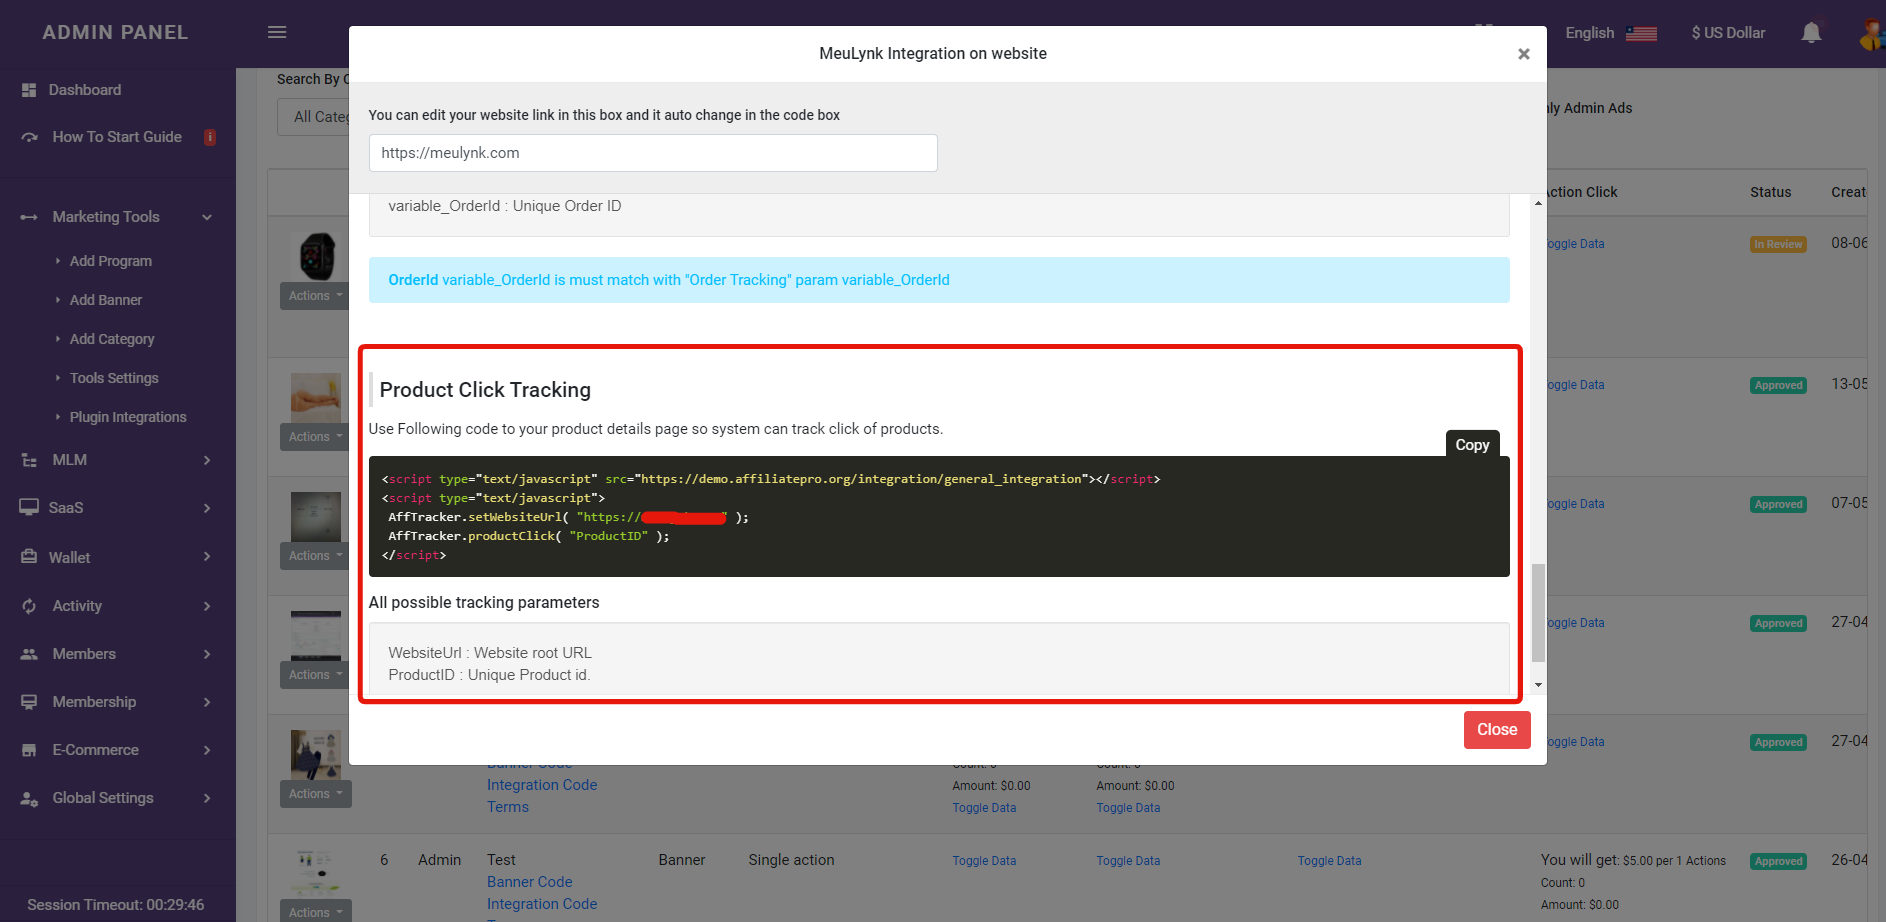
Instructions to the product click tracking integration:

This code needs to integrate into your product template page with the productID variable

ProductID– replace it with your dynamic variable.
WebsiteUrl = it auto set in the banner, just insert your site page or the page you want your users will land on when they press on the banners

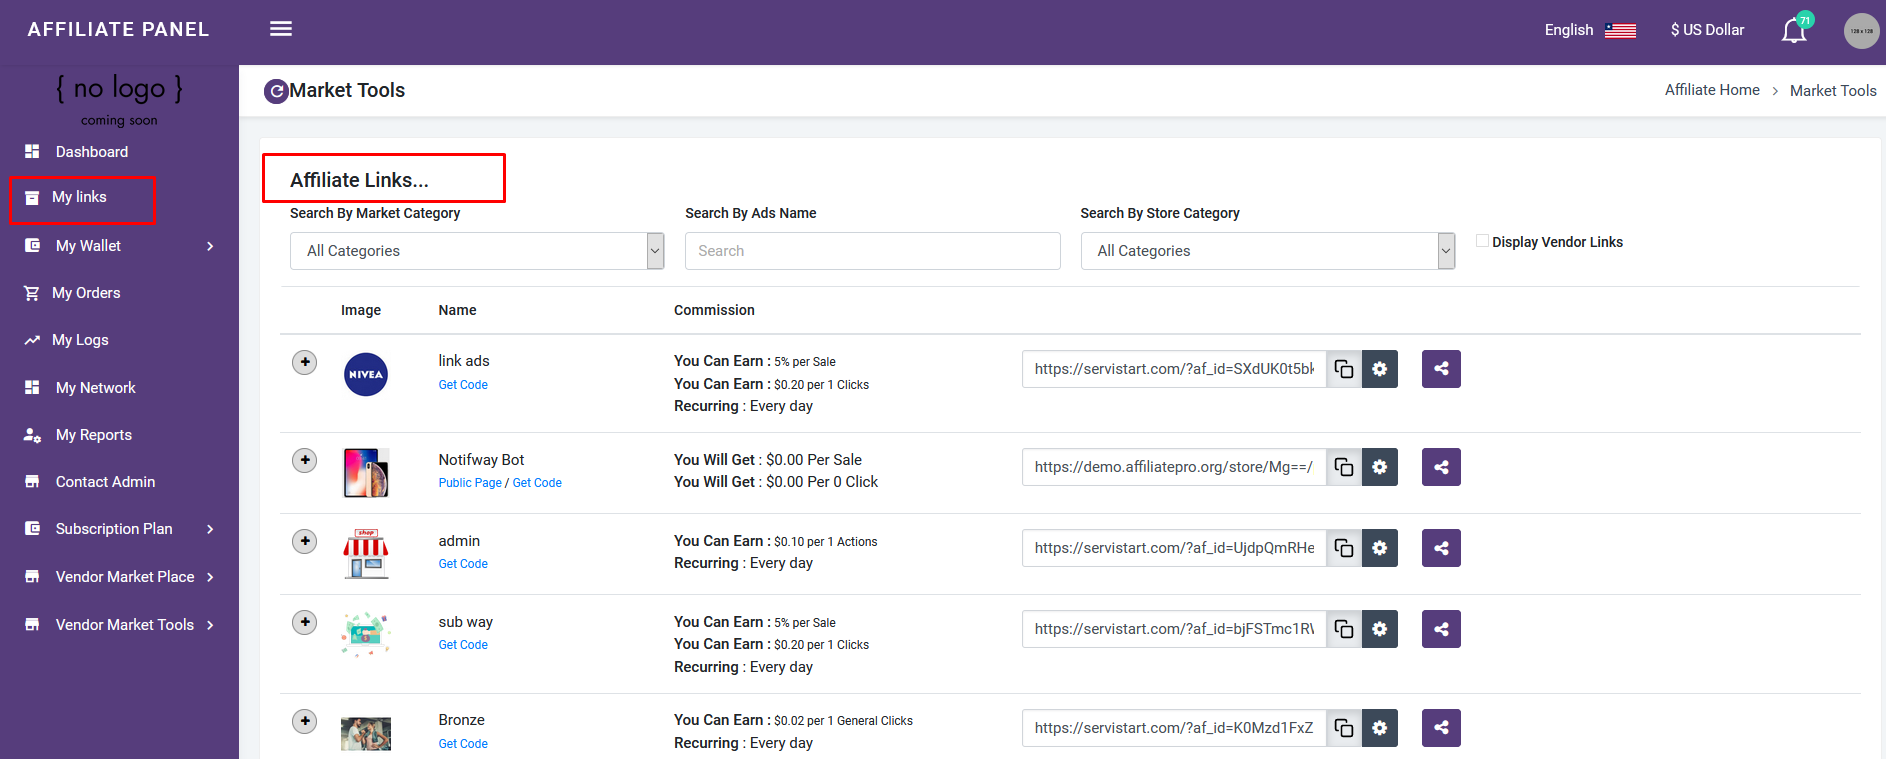
Affiliate can see the banner on his side and share